
அன்புள்ள சுய வெளியீட்டாளரே
Thank you very much for deciding to be a self-publisher.To become a self-publisher lodge your interest இங்கே காணலாம்.
The purpose of Nonimi.ink is to provide wider opportunities for bilingual creators to prosper economically through their innovative content by creating a platform for attributing value to their masterpieces.
You can participate in winning dialogs and win prizes.
Soon you can mark your content as premium and obtain a return for your great effort.
Here is the basic guideline you have to remember. Don’t forget that the following functions are enabled when your membership is upgraded to self-publisher.
Navigate to create a new post
In case you can’t find how to navigate to the new post in the left panel, follow the below link.
https://nonimi.ink/wp-admin/post-new.php
Then, you will be in the editor’s view of a new post.
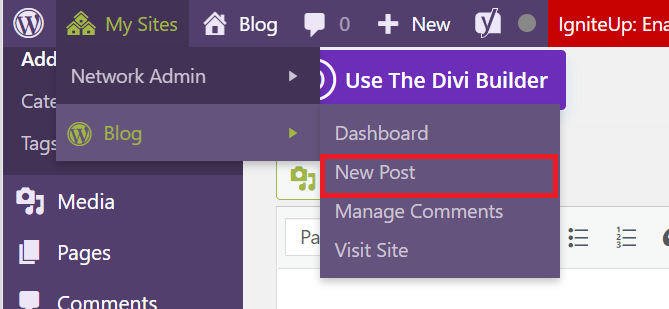

Navigate to create a new post
(Mandatory) Select a suitable title for your article.
You can change the URL of the article.URL of the article appears as in the link of the article.

how to change the title and URL of the article
(Mandatory) Organize your content in an appropriate to highlight the purpose of the article.
Make sure you really worry about the engagement of the internet readers. Internet readers skim the content and your output will be bold out if you can stop them within the article. So having subheadings, proper paragraph size is crucial for success as a self-publisher.
Use the top menu to change text type (paragraph or title), make text bold, and change alignment or quote.


Options facilitated in the editor menu
Use the dropdown highlighted in the above image to convert our sentence to a heading. First, highlight the sentence required to change and then click on the required heading type (H1,H2 etc.)
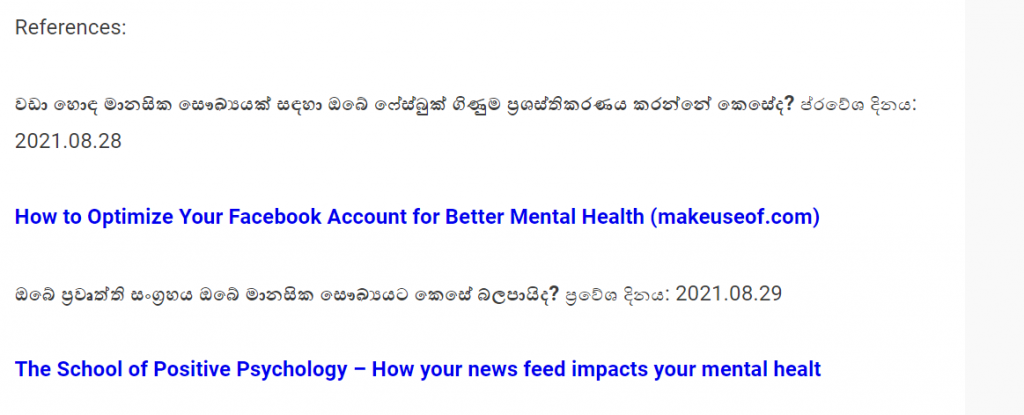
(Mandatory) Referencing
Writers should add references for all the content obtained from other intellectuals other than your own generated ideas. Make sure you list them at the end of the article like in the following image.
<name of the reference, access date, link >

(Mandatory)Eye-catching Image at the top of the article
Eye-catching images can stop the web reader within the article and demand them to engage more time with other content of the article. However, images do not produce by yourself are required to give credits to respective owners.
To upload the images you can copy and paste them, drag and drop or use the “Add Media” button top of the editor.


Assume you need to reference the image originator based on his link . The caption (description) of the image will be,
Humans are better if they use the mind for the betterment of all, Tingey Injury Law Firm, unsplash.com
<Caption (description) of the image, name of the creator with link to the original content >
To link the caption, highlight the caption or name of the creator like below. Then, click on the link button. Then, paste the web URL of the location’s original image in the box that appeared. Finally, press enter.

 The final outcome of the image referencing looks as follows.
Human is unique if they use the mind for the betterment of all living and non-living beings in the world, Tingey Injury Law Firm, unsplash.com
(Mandatory) add tags (maximum five tags)
Tags your post to make it reachable to the target audience in the webspace.

(Mandatory) Add Featured Image
The featured image will appear with your article title in the blog post list view. To be highlighted upon others use the attractive image as a featured image relent to your topic. Encouraged to use canva.com and create your own featured image to bold out of others. Please kindly give a reference for original content at the bottom of the article, in case you are obtaining others’ creations.

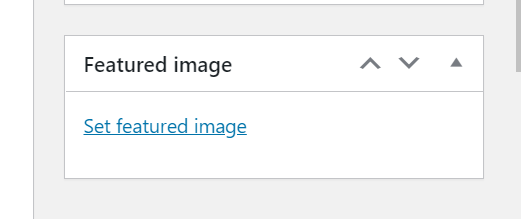
Section to add featured image in the right panel
When the featured image is added successfully it should be visible as follows.

In case you need to edit any image already added, click on the image and click the pencil button. You can resize, crop, or replace the image through the media popup. You can add the Alternative Text (Alt text) or the image caption in the popup window gets appeared.

 Don’t forget to Save
Finally don’t forget the save the draft or update by clicking the “Save Draft” or “Submit for Review” button on the top right corner. Be patient until the loading button is disappeared to make sure the contest is actually saved.

That’s all you need to get a start, Wish you all the best for your thoughtful journey.